
Creating 2D Isometric Tilemaps in Unity (part 1)
Day 006 #PanicRoom
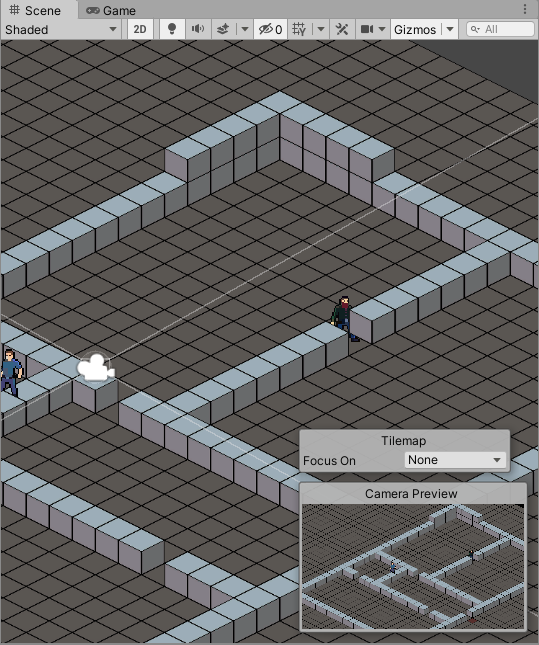
Day 070 #100DaysOfGameDev
I wanted to start creating my new game in Unity as a 2D Isometric style game. While I found a few decent sources on the internet to help me with that endeavor, I didn’t really feel any of them were giving me exactly what I needed to know or didn’t explain things very well. Almost giving up in frustration, I decided to take a step back and start with renewed focus; if a proper guide didn’t exist then I would write one!
By forcing myself to completely understand each step I was taking so that I could properly write about it, I was ensuring I was learning the skills I would need to work with this style of game. The added side-effect of writing a guide I could understand and reference for myself meant that I could post it online for others following behind me to read and learn from as well. We indie developers need to help each other out and this is one way I can give back to the community that has already helped me out on several occasions.
I give you my journey on working with 2D Isometric Tilemaps:
Preface
The Sprites I created for my Tilemaps are 64×64, so all the settings I use are geared towards that size. If your Sprites are a different size you will have to adjust accordingly. There are some decent guides out there detailing the size to isometric angle relationship and I assume you will have that figured out. Also, I am only working with standard Isometric Tilemaps, not Isometric Z As Y Tilemaps, which are a slightly different animal. My game doesn’t really require a lot of different elevations so I am keeping it straightforward and simple.
Creating 2D Isometric Tilemaps
- To sort the tiles based on height, go into Edit > Project Settings… and change the Transparency Sort Mode to Custom and set the Transparency Sort Axis values to (0, 1, 0).


- Right-click an open spot in the Hierarchy and create a new 2D Object > Isometric Tilemap
- This creates a new Grid which will then house one new Tilemap child object


- Create a Tile Palette by bringing up the Tile Palette Window from Window > 2D > Tile Palette and selecting Create New Palette


- Set the Grid of the new Palette to Isometric and the Cell Size to Manual and adjust it to your tile size
- To add Tiles to the Palette, grab a Tile Sprite and drag it over to the Tile Palette Window, which will create a new Tile Asset
- If your Grid is not exactly aligned with your Tiles (as seen to the right), then go to your Palette object and choose Open Prefab. From here you can access the Palette Layers and adjust the Tile Anchor settings to line things up just the way you want


- When attempting to paint Tiles that appear to go up something happens – they appear BEHIND other existing tiles, not on top! This can be solved by adding an additional Layer to paint on which will give the look of Stacked Tiles.
- Create a new Tilemap within your Grid by adding 2D Object > Tilemap. Give the new Tilemap a higher Order in Layer value and also change the Tile Anchor settings to make it anchor to a higher point on the Grid. Usually you will increase your X and Y values by 1 for each new Tilemap Layer.


- Now when the Tiles get painted into the Scene, they appear stacked just like we wanted. Oh, no! That actually didn’t work out right at all! This is because the Render Mode is set to Chunk, which is effective for batch rendering large blocks of Tiles but not really well suited for dynamically sorting behind and in front of objects while you edit your Tilemaps.

- Change the Tilemap Renderer Mode from Chunk to Individual and the Tiles will then appear exactly as desired.

In Part 2 of this study of Isometric Tilemaps I will cover Collisions and how to constrain the Player to playable areas.
(to be continued)


